Showing posts with label brista homes remodel. Show all posts

Thursday, July 18, 2013

SNEAK PREVIEW: Will You Be the Lucky Buyer?

Brista Homes Remodel Nears Completion


If you are looking for a beautifully updated move-in-ready condo, then this is it!  Located in the Meadows of Sarasota, this unit is contemporary and stunning. Every square inch has been renovated with style and class. You won't find another one like it.  Here's your sneak preview!  

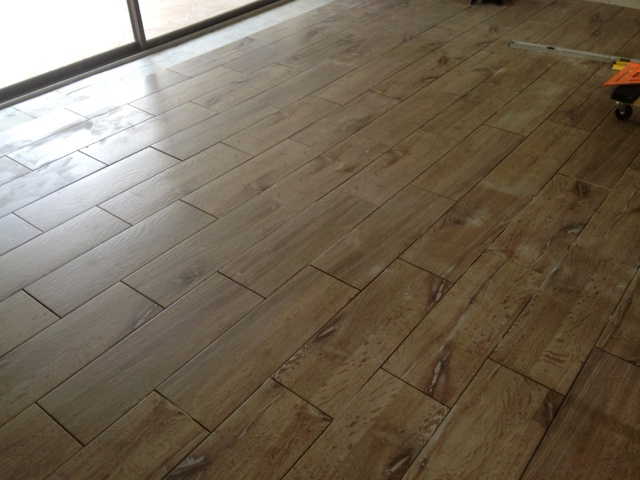
Is it wood or tile?
It's hard to tell with this classy rectangular ceramic tile.
 
New espresso cabinetswith soft close drawers, a glass 
mosaictile back splash, Cambria counter tops, and stainless
steel appliances make this kitchen a chef's dream.


Homes in the Sarasota market are selling quickly and many times multiple offer situations come into play. With approximately 10 days left until completion, and this unit not yet listed on the MLS, this could be your opportunity to purchase your dream home before another buyer beats you to it. Once it hits the MLS, like with Brista Homes prior renovations, there will be a lot of activity and it will sell fast. 

Located in the wonderfully maintained community of the Meadows, this second story unit's redesigned kitchen will boast espresso shaker style cabinets, glass tile backsplash, Cambria counter tops and stainless steel appliances.  Rectangular ceramic tile mimicking distressed salvaged wood completes the look and continues through out the rest of the main living areas, including both bathrooms. The bedrooms switch up to hand scraped dark hard wood flooring.

Other new features include:
  • Newly remodeled bathrooms with soft close doors and drawers
  • New contemporay soft white doors through out
  • New soft white contemporary mouldings with gray painted walls
  • New water heater
  • New air conditioning unit
  • New contemporary light fixtures and fan
  • New recessed lighting in kitchen
  • Large tiled lanai with storage closet and a great view!

Asking $159,900. 

For additional information or to view, please contact Mark Ursini at 941-232-1948 or by email.


Tuesday, June 18, 2013

Remodel Your Investment Home: The Steps From Start To Finish

Get ready to remodel and flip.

Remodeling an investment property can be an intimidating task for any investor, but with the right contractor and the proper steps, a remodel can prove to be quite profitable. Take a look at this extensive remodel by Brista Homes. The end result was a brand new home (aside from it's age) with a turn around time, from start to finish, of three months.

Step One: Estimating the Renovation Costs
Estimates were started as soon as the home went under contract. Once all the numbers were in, it was time to separate the "musts" from the "wants". For example, repairing the roof, and replacing the AC unit and water tank were a "must". Tearing down the kitchen wall to make it an open concept was a "want" but fit the budget.

remodel and flip                                           


As soon as the property closed, all supplies and material were ordered.

Step Two: Meet the Neighbors
Introduction letters were sent to the neighbors and the association informing them of the renovations and where to direct concerns they might have through out the process. This helped the job to start off on the right foot.

Helpful hint: As a result of the letter, you may receive calls early on about interest in the home. Make it a point to only show the home once the remodel is 100% complete, or if not, very close to it. Save their information and assure them that you will update them when the home is nearing completion.

Step Three: The Demolition
Within hours after closing, the dumpster was delivered. The demolition was started immediately. The tacky wall paper was stripped, the popcorn ceilings were scraped, the moldings and doors were removed, the kitchen and guest bathroom was gutted, and the confining kitchen wall was removed. The only two items salvaged in this property were the hardwood floors, the master bath marble tile, and a small section of kitchen cabinets that were cleaned and reused in the laundry area.

A Lakewood Ranch remodel                                       


Step Four: Rough-in Mechanical Stage
These "must" items in the remodel were tackled first:
AC duct work
Electrical wiring for recessed lighting
Plumbing behind the walls
Roof repair

Helpful hints: Do not re-texture and paint the ceilings without repairing the roof leaks first. Do not repair dry wall before fixing the plumbing.

Step Five: The Installations
The following items were taken care of during the installation process:
Drywall repair
Retexturing of the walls and ceilings
Trim work
Painting
Installation of kitchen cabinets and bathroom vanities
Floor and wall tile installation
Granite counter tops installation
Hard wood floors sanded

Appraisal issuesHelpful hint: When doing a kitchen, bring your dimensions to Lowe's or Home Depot and have them design the kitchen for you. You'll get the right size cabinets with a good fit.

Step Six:Trim Out
The remodel was now ready for the finishing touches. This is also referred to as punch out and consists of the installation of plumbing fixtures, light fixtures, and outlet covers, paint touch up, etc. It's a good idea to walk through at this point and create a punch list of items that need completion. These finishing details are what makes the remodel stand out above the rest.

Remodel and Flip                                     


Step Seven: Construction Clean
The home was professionally cleaned, including the windows.

Step Eight: The Garage
The garage doubled as a work shop during the remodel process, so it did not make sense to tackle this area until the end. The painting of the garage trim and walls were scheduled at the same time as the interior paint touch up. The garage floors were acid washed, etched, and received two coats of epoxy. Not only did the homes interior look brand new, but now the garage did too.

Next, the hard wood floors were stained and sealed. The floors received three coats of sealer, and were sanded lightly between each coat.

A Lakewood Ranch remodel project A Lakewood Ranch remodel
Step Nine: Carpeting
Since workers were coming in and out of the home, the carpets were installed last. Wall to wall carpeting went into the master and guest bedrooms.

A Brista Homes remodel


Step Ten: The Exterior
Curb appeal plays an important part in making your investment property stand out from the rest. The home was pressure washed the and damaged lanai screens were replaced. A professional landscaper was hired to clean the yard and remove the old stone hardscaping. Mulch and flowers were added along the walkway. An appealing exterior sets a good first impression and attracts buyers.

  Remodeling your Lakewood Ranch investment property

Call Mark Ursini at 941-232-1948 or visit http://www.BristaHomes.com to receive an estimate on your next remodel.

Call Gina Ursini at 941-812-4894 or visit http://SarasotaHomesCollection.com to find your next investment home.

Monday, June 17, 2013

Contractor Tips for Remodeling on a Budget

Remodel without sacrificing your style or budget


Remodeling can be expensive, and many times more costly than you originally expected, especially  if you start to make changes during the process.  Stay on plan by following these contractor tips for remodeling on a budget.

1.  Find a contractor that has a creative mind and is considerate of your budget.  Be honest about your budget from the start.  If a contractor knows you are serious about doing business with them, and not shopping around for a bunch of estimates,  they will spend more time finding creative ways to meet your criteria.

2.  Time is money. Pick a contractor and architect that will work in completing your plans in a timely manner. Before finalizing this step, make sure you are 100% satisfied with them. Making changes during the remodeling process means costly change orders down the road.

3.  Shop for good deals. Once your plans are complete, and you know what is needed for the project, shop around at second hand stores, tag sales, and Craig's list for budget friendly items.  It's important this step is done prior to the start of the remodel. Making changes during the process will effect both budget and cost.

Repurposed cabinets for the kitchen
Using salvaged items does not mean you need to compromise style. These 42" raised panel cabinets, the stainless steel appliances, and the black granite counter tops are all second hand finds. If you have these items on hand prior to the start of the project, a creative contractor can make it work.

4.  Do some work on your own. This should be addressed during your first meeting with the contractor as some may not allow this.  If your contractor is open to it, do the work when it's convenient to the contractor, such as on the weekends.

5. Have a good attitude. You  know the golden rule, treat others how you want to be treated. Treat your contractor and his subcontractors with respect. Your kindness will go a lot further, especially in the case that you decide on some last minute changes.

6.  Make prompt payments.  Abide by the terms of your contract and meet payment deadlines.  Failing to do so can hold up the project. Developing a good relationship with your contractor, means they are more likely to go that extra step for you when  needed.